Keys to Truly Multi-Functional Room

Life here is busy! With Landon starting school and soccer, Lizzy starting her homeschool program, and my husband and I both in school you could say free time is very few and far between. With all of these moving parts I decided we needed a space in our house that would allow us all to get what we needed to get done but still be all together as family. Trying to make the most out of house that seemingly is busting at the seam with people and uses I tackled using our back living space as a truly multi-functional room. After much tweaking and adding a little here and a little there I think I have come up with a room that serves all of it’s needs pretty well while not sacrificing our style. So without further or do here is our “family room”!
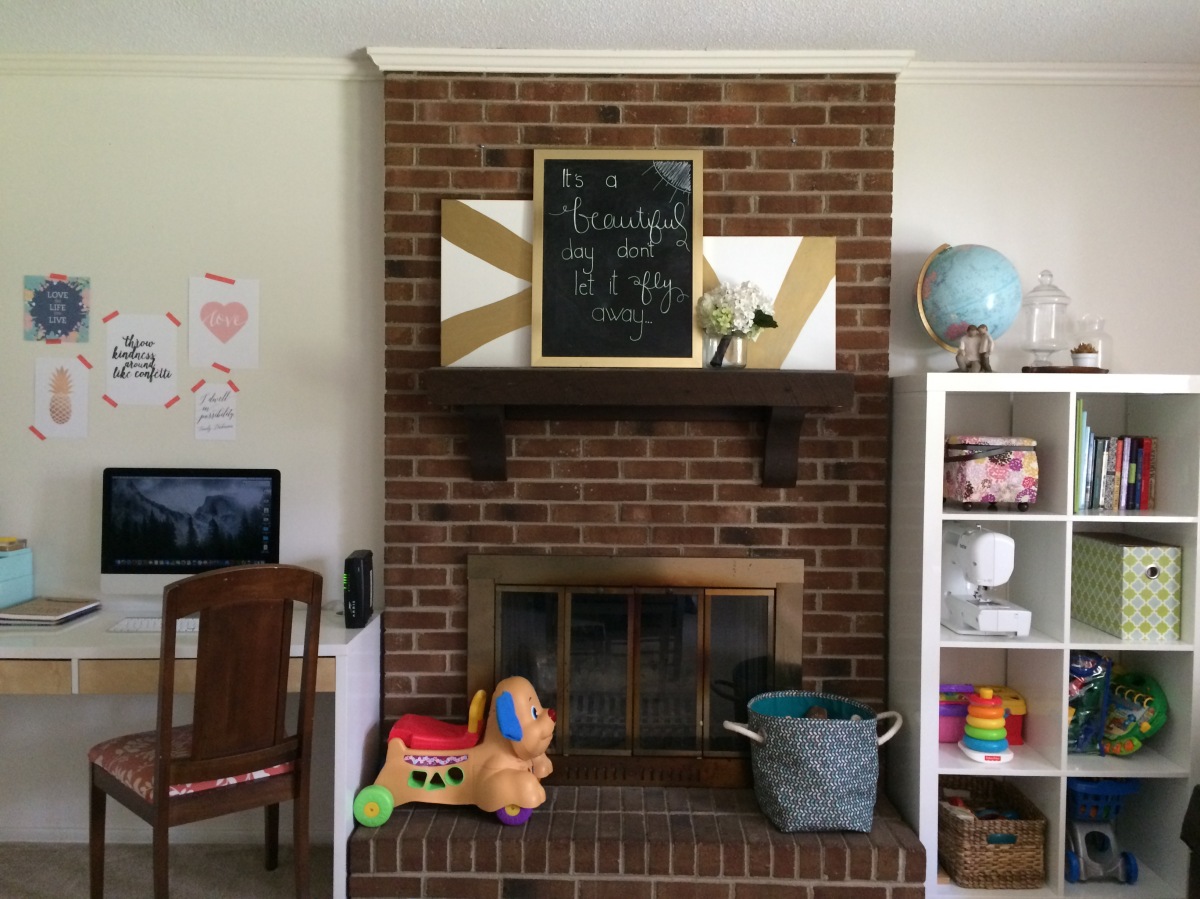
IMG_1530

1. The home office

Both my husband and I are online college students and in addition to that I sell used children’s clothes on a great site called Kidizen, not to mention I blog in this little space. Needless to say we needed a place that could house our computer, basic office supplies, and all the tools that I use to stay organized. Above the desk I wanted to add a little touch of pretty and motivational quotes (that were all free printables online, I’ll link the sources at the end!) to keep us going when we are inevitably burning that midnight oil.  I love Martha Stewart and her office line at Staples provided great pieces that together make a place for us to stash current bills to be paid, important school papers, and of course coupons!

IMG_1535

2. The family command center

We also needed a place where we could keep all the moving parts organized. With three kids and various schedules and appointments I was pulling my hair out trying to keep it all together. I love this large desk calendar that I got from Target. It has lots of space for any and everything we need to know for the month. I just attached it with some jumbo pink push pins that I got from the dollar spot at Target as well. Are you getting the theme? That’s right this command center was made with just about everything from Target. That sweet little notes dry erase board? The dollar section in Target, that magnetic chalkboard, Target and the magnetic cup holder also from Target. Boy, do I love me some Target. The blessing quote was a free printable that I found online and tucked into a white frame with a mat from Walmart. This space serves to keep us up to date and informed and I love that if the hubby has a question about the schedule he know right where to go!

IMG_1519

3. The homeschool center

I decided this year to homeschool Lizzy for preschool because she has so many therapies I didn’t want her day at a center to be interrupted so many times a week. This way it’s flexible with her therapy schedule and we are hopefully getting a jump on everything she would be learning had she went to a center like her brother. With that in mind I needed a section of this room that would serve as her classroom. An old cork board that was previously part of my old family command center became the “board” and the cabinet we got from IKEA ages ago serves as the base to house all our books, curriculum, and supplies. It’s a really functional space that didn’t dominate or overtake the room.

IMG_1539

4. Playroom / Craft room

This room also serves as a playroom for the kids.  A Craigslist find in the table and chairs and the white cubby bookcase from IKEA creates lots of storage and ample room for the kids to create and explore. I also needed a place to house all my craft supplies that didn’t fit in the cabinet in the homeschool section of the room. I love fabric and sewing so the hunter green dresser was actually an IKEA hack! I painted the formally birch color dresser and added some brackets and new drawer hardware. The result is a pretty nice looking storage piece to house all my fabric and other sewing goodies.

This room has met all our needs so far and hopefully will continue to for a while. It was definitely a labor of love, a puzzle that took some time just to get it right. Right now I am just basking in the glory of it all while kicking up my feet and enjoying the view.

IMG_1522 IMG_1523 IMG_1524 IMG_1528

Sources:

Leather Couch: Furniture Fair (bought on clearance, now discontinued)

White Cubby bookcase: IKEA

Toy storage bin with handles: DIY using this tutorial

Desk: IKEA (all though they don’t offer the white and birch option anymore)

Chair: Local thrift store find

Desk Storage: Staples

Washi Tape Wall Art Gallery: “Love the Life You Live”, “Throw kindness around like confetti”, “Love” heart, gold pineapple, “I dwell in possibility“, “So many blessings be thankful everyday”

White glass door storage cabinet: IKEA

Craft “campaign” dresser: DIY from this dresser, Valspar’s Peacock House paint, Gold drawer pulls and 1″ gold flat corner braces

Easy Curtain Tutorial

If you follow me on Instagram you would know I am in full fall decorating mode. I have probably purchased way too much fabric, but with all the pretty fall inspired patterns out there how could I resist? I am even on a first name basis with the fabric lady at Hobby Lobby… this may be a problem soon. Even so I have started all the projects necessary to turn my bright cheery summer home into one that is ready for fall. And because to me no room is fully dressed without curtains I tackled that first. Now, disclaimer here I am not an expert seamstress. So when I first started dabbling in sewing I looked for a good curtain tutorial and guess what; for the beginner I am I found none! So through lots of tears, miscalculations, and trial and error I finally got a system that I think is pretty full proof for anyone to make some awesome simple curtains. They don’t require any special stitches or machines. No serging here sorry. If you can sew a straight line and use an iron you are good to go. So let’s get to it!

First you have to gather your supplies:

IMG_1423 (1)

2 3/4 yards of 60″ fabric

coordinating thread

straight pins

scissors/ or rotary cutter

tape measure

sewing machine

iron and ironing board

First you want to cut your fabric in half lengthwise to make two panels. I prefer that my panel not be super wide because I have pretty standard windows. You will end up with two (2) 30″ panels. Next, you want to prepare the sides for hemming. Iron down the side 1/2″ inch and then roll that over another 1/2″ inch. This makes sure your unfinished edge is  secure and the panel looks nice and neat. Pin in place and sew a straight stitch done the side. Repeat on the other side of the panel. Then repeat again on the other panel.

IMG_1424 IMG_1425 IMG_1426

Then you are going to create the pocket for the curtain rod. Fold down the top 1/2″ and iron. Then fold down 2 1/2″ to create the pocket. Pin this into place and straight stitch. Repeat with the other panel.

IMG_1427 IMG_1428

Okay now you want to hem. I wanted 83″ panels so I measured from the top of the pocket to the end and fold up the extra in 2 3/4″ increments. I kept the extra length so if I did ever want to hang these curtains from the ceiling I could let the hem out. If that is not a concern for you then just fold up 1/2″ and then 2 3/4″ again and cut away the extra fabric. Now, straight stitch along this hem as well. Repeat with the other panel.

IMG_1430

You’re finished! Sit back and enjoy the fruits of your labor. I’m on to work on pillow covers. If you have some leftover energy you can tackle the pillow covers using my tutorial here. Happy decorating!

IMG_1432

DIY: Easy Zippered Pillow Cover Tutorial

I love pillows. Can you tell, all those pillows are currently on my couch. Yep, I may have a problem. If I had it my way I would have them everywhere in my house. My husband, he’s not so enthusiastic about my love of these comfy, soft squares, but he is coming around. The only thing is with 3 kids running around I find that our pillows can get pretty downright grimy. And don’t even get me started on the stains! While washing and refreshing my actual pillows is a necessity at times, there are sometimes that I just want to switch out the cover. Whether it had a meet and greet with Lizzy and Lily, need I say more? Or if I feel like the room needs some new life. They can add some fresh design without breaking the bank.

 Covers for my pillows was actually the first sewing project that I ever undertook so if you are a newbie, start here. I promise it is painless. Well stick pins aside almost painless. While I have made button and envelope close covers my favorite has to be a zipper cover. Again, I have a toddler, a very busy one and buttons seem to go flying off and pillows magically end up outside of their covers with the other two closures when she is around. Zippers, she has not mastered yet, I know yet… So if you are ready to take on a project that is easy and you can do in one nap time or about 1 hour pull out that sewing machine and we can get started!

First you want to gather your supplies:

Fabric
Zipper
Coordinating Thread
Sewing Machine
Straight Pins
Seam Ripper
Scissors

I like a snug pillow cover so I cut 2 pieces of fabric to the same dimensions of the pillow I am covering. Today I had a pillow that was 22″ x 22″ so I cut two squares that were, you guessed it 22′ x 22″. For the zipper you want a zipper that is 1″ shorter than the length of the side you are putting it in. So in this case you want a 20″ zipper. I prefer invisible zippers but you can definitely use whatever you like or was on sale. I’m a sucker for a good zipper sale. I had to shorten my zipper so I just followed the instructions on the package to do so. 
Now we are going to create a place for the zipper to go. Take both pieces of fabric and lay them together right sides facing in. Pin in place. Then you are going to baste, or sew with your sewing machine set to the longest thread length possible, down the side that you want your zipper to go.

Now you want to press that seam open. 
Great! Now you are ready to install your zipper. Lay your zipper centered and zipper pull facing down on the seam you pressed open. Pin into place. We are going to sew down both sides of the zipper on the front side of the fabric. This is when that zipper foot for your sewing machine comes in handy. See you did find a use for it! 
Time to expose that beautiful zipper you just installed. Using a seam ripper open up those basting stitches that you put in down the center and revel in the fact that you have just put in a zipper Yay! 
Okay you’re almost done. Now we have to sew the whole beauty up. Open the zipper halfway. DON’T FORGET this part or you won’t be able to turn the cover! Fold the fabric back again so the right sides are facing in. Pin all the way around the remaining three sides. With a 1/2 inch seam allowance sew around all 3 sides. 

Phew! Almost done, I promise. Now you want those pretty sharp corners right? So cut a triangle tip off the side of all the four corners. Turn the pillow right sides out and use the pencil to push those corners out. Press the cover and fill with your pillow form. Voila! You have a new cover for your cushion. 

Great work! Just don’t blame me if you start recovering any and every pillow in your house. I’m just saying…

DIY Rental Master Bedroom on a Budget

The master bedroom, or any bedroom for that matter is a place to sleep, but so much more it is the one personal space that you have in a home. It should reflect your personal style and give your mind pause and rest from world. Even more so if you have children you know that there aren’t many places to hide in the house. Sneaking away to a place where I can dare I say indulge myself in a novel, prepare and plan for the next day, or just rest my head for what seems nowadays a 15 minute nap I wanted our room to be that place. Everyone needs some time to decompress and recharge alone, and although I do allow Landon, Lizzy and Lily to spend some time in there I wanted it reflect a more soft and mature style than the rest of our cheery, kid-friendly abode.

So I started to pour over magazines, Pinterest boards and seek inspiration from the amazing design blogs I follow on Instagram and became so immersed in the mood and style I wanted for our room. I had paint swatches and grandiose plans of wood planks and drama. For a brief moment I drawn into my design bubble where anything is possible. Then I remembered that we are renters. Being a military family it just hasn’t made sense for us to purchase a home. We never know where we might end up and the thought of being saddled with a mortgage and orders to another state or dare I say country is something we just didn’t want to deal with. 
Dialing back my aspirations was frustrating, but caused me to create a space that I think others might find inspiring especially if they do are dealing with less than lackluster white walls and a small budget. It was an exciting project that I can say I am proud to share with you. Along the way I found out some tips and principles that you can use and apply to any budget bedroom makeover or refresh. They are….

1. Use soft colors to create the illusion of more space.
I have lived in just about every size master bedroom. I have had more space than I know what to do with and I have lived in about the tiniest space I thought I could ever shove a dresser and queen size bed into. Luckily this bedroom is a good medium of the homes we have lived in. Not overwhelmingly large, but not so tiny I can’t create a pathway from the door to the bed without tripping on the furniture. Even so, with two adults in the room and no walk in closet you have to add furniture for storage. To combat the feeling of that we choose a white wrought iron frame for our bed and I used pale coral, grey and white linens to create a softer look. The curtains are also a pale turquoise so it lets in the light and blends into the already white walls. While I would have loved to used a nice creamy light beige or gray on the walls I had to compromise in light of the fact that we are renting…

2. Create a multifunctional space
Back to being a busy mom and finding time to get away. I have such an amazing husband that will take our kids and allow me time to work on projects that I am passionate about, but since we don’t have a basement and our kids rooms are not the largest our office space has to double as a playroom. That means our desk is in the midst of chaos most of the time. Also we do have a bathroom in our room which is a blessing (especially since our last rental only had one!), but it is on the smaller side so when I need to do my make up I was invariably hogging the mirror space. So I took a desk and put it beside the bed and created a vanity, desk, and nightstand combo. Now I have storage for all my make up, a place to write, and also a surface to house my latest reading material for bedtime. Using the space beside your bed wisely can create extra space in your house and give you more room to do the things you love. 
3. Don’t be afraid to Do It Yourself
I love a craft project. The feeling I get when I complete a project is unlike any other. It might be better than chocolate… maybe. For this room I decided to tackle just a few projects. I made the curtains and button pillow cover on the reading chair and I created some wall art. They were all very simple and I was able to make 4 curtain panels for the two windows for less than $20! That I would say is a major score. Whether you are constrained by your budget or you haven’t been able to find that perfect piece there is a wealth of diy resources online that can make any dream come true.

Could the room be more like my HGTV dreams? Of course but design is an ever evolving process for me. I’ll probably wake up tomorrow and decide to add another piece of wall art or move the chair. I have to continuly tweak, add and subtract. That’s what makes it so much fun! For now though I think I will take my own advice and relax in the space. Well at least for a minute then it’s on to the next project, the girls shared space…